Friday, September 30, 2016

Winner Winner Chicken Dinner!


Oh, how I've always wanted to write that! Ha!

We have a chicken dinner winner tonight!

Under the close supervision of Miss Sophie, my husband pulled a name from the John Deere hat.

 The lucky winner of the Jordan Fabrics table runner is.....


"Your runner looks fabulous! I bet it was fun, too! I'd pick either the Christmas runner
or the one called Paper Bandana. Great Giveaway! Thanks. "

I have sent you an email and you can decide which runner you would like!
I know you will love either one!


jordanfabrics.com


Have a great weekend, my friends!
Kathy


Monday, September 26, 2016

Autmum is here and so is my FIRST GIVEAWAY!

Autumn arrived last week, but someone forgot to inform Mother Nature to dial down the temperature and humidity levels in the Midwest. It was warm, rainy, and terribly humid all last week. Ugh.

I couldn't get outside to do much in the evenings, so I looked through my projects to find something seasonal and fun to work on. Here is where I found a Jordan Fabrics table runner kit...the perfect project! This kit is the Jo Morton Spice Market Patchwork Table Runner Kit.

Upon opening the kit, I found very clear directions and photos, along with precision-cut pieces already laid out according to size. This was going to be fun and easy!

I wish I'd taken a photo of the kit as it was set up in the wrapper, but I didn't. I was too excited to get started and stitching!

You can see the precut strips and with the pictorial instructions, it's super easy to line them up and stitch together. This was my first ever Log Cabin block. Yep, I can't believe it either.


My first Log Cabin block:


It wasn't long before I had all 4 blocks completed and sewn together!


The next step was to make a sandwich with my own batting and the backing that was included in the kit. A simple stitch was sewn all around the edges, leaving a 4 inch opening to flip.


I used a variegated King Tut thread I had in my collection for the quilting. I like the idea of a binding on the edges, so I made a "faux" one by stitching 1/2' around the edges.


I planned on a simple cross-hatch quilting in a diamond shape. I used a white pencil to draw my lines on the back. In a "highly technical" method, the width of my clear ruler became the width of the spaces. Whatever works, right?


Don't worry, those white lines are NOT visible after stitching!
Even if they were, they're on the back and can be removed.


The finished Jordan Fabrics table runner! It was quick, fun and so lovely!


Doesn't it look great on my hutch cabinet?


Jordan Fabrics has many other items on their website, including quilt kits, patterns and quilting fabric. Check them out here: Jordan Fabrics


Here's the best part!

Jordan Fabrics is generously offering one Log Cabin table runner kit to one of my readers!
If you'd like to win a Log Cabin Table Runner kit from Jordan Fabrics, click HERE to choose your favorite. Then, in a comment below, include the name of your favorite Log Cabin table runner kit.

Want a second chance to win? Tell me how you follow my blog.

A random winner will be chosen on Friday, September 30th and notified by email.
My newly retired husband will do the pickin' from a hat!
Be sure to include your email if you are concerned about me finding you!


Wednesday, September 21, 2016

My Crosscut Quilt

I was a bit late in joining the party to the Crosscut Quilt-Along I found on Instagram this past summer. Yep, summer 2016 has already PASSED! How did that happen??? The moment I saw some of the photos, I knew I had to join in. I love modern, improv quilting and this was just my groove.

Debbie at A Quilter's Table is the designer of this technique and she has one heck of a creative mind! I could make a thousand of these and no two would look alike.
You can follow her tutorial here: Crosscut Block Tutorial.

Here's my Crosscut journey:


 I chose my fabrics from my stash according to the décor of "someone special".
This will be a Christmas gift, so no names will be shared here!


These are my first 9 blocks. Already looks cool, doesn't it?


I needed many more blocks to make a quilt big enough to wrap up in while on the couch,
so more were added.


This is a crappy photo, but I laid it on top of a black fuzzy throw we use often in our house.
I needed to compare sizes. More blocks needed!


Just a pretty pic of the triangles and strips.
Not many things really look good against my purple cutting mat.


Here is the full top BEFORE it was cut apart!!
This is the step that I didn't think I could do....I had to cut it up!
But I did.
And I was happy.


The first few cuts.


The freshly cut blocks scattered on the floor as I tried to find the best arrangement.


Proof that Miss Sophie was here!
The stinker.


Here is the new Crosscut quilt top all sewn back together.


A close up before quilting.


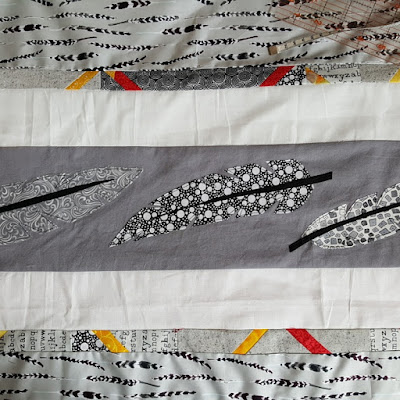
These are photos of the back. I used some leftover fabrics to cut feathers using a template I found online. Then I used Lara Buccella's technique from her book Crafted Applique to adhere them. I have wanted to try Lara's technique since her book came out earlier this year, so this was the perfect time! It turned out wonderfully and added a lot to make a very unique backing for this quilt.

I machine quilted this 50" x 60" Crosscut quilt using a wavy stitch starting on one corner and going to the adjacent corner making curves. Of course, the curves got bigger and bigger the farther I went.
I really like the effect overall.

The finished product:


I am entering this quilt into two challenges:


Sunday, September 18, 2016

I Owe My Sanity to Ruby


Four years ago when I quit my full time teaching position, my husband surprised me with a gift I will always be thankful for. Ruby. A Designer Ruby sewing/embroidery machine made by Husqvarna Viking. I already had a Singer sewing machine for over 25 years and had made wardrobes of clothes and costumes for my kids.
But this machine was different. Not only could it sew, but it could embroider!

It came in a huge red case that looked like a suitcase. It sat on our dining room floor for almost 3 months before I had the courage to even take it out!!

Keep in mind that I was suffering from severe teacher burn-out and possibly some depression. My brain was fried, along with my nerves and it took me 3 months to rehabilitate to even think about starting something new. My husband finally sat down with me and helped me figure out how to use Miss Ruby. He lit the candle inside me! I was soon watching youtube videos, joining facebook machine embroidery groups, and practicing almost daily.

Since then, I've spent a small fortune on embroidery designs, stabilizers, threads and not to mention fabric! That machine saved my sanity.  I started making baby bibs and personalizing them with names and an applique. Soon I was embroidering on shirts, towels, and tote bags. I've made probably 100 in-the-hoop mug rugs with names on them. I've also made several wall hangings with verses, along with outdoor garden flags. I haven't shared many of my projects here, so I thought I'd do that in one post. These are not all, but a good smattering of what I've worked on.


And then I got the quilting bug....