Saturday, January 30, 2021

RSC January 2021 Pink! and Table Scraps Challenge

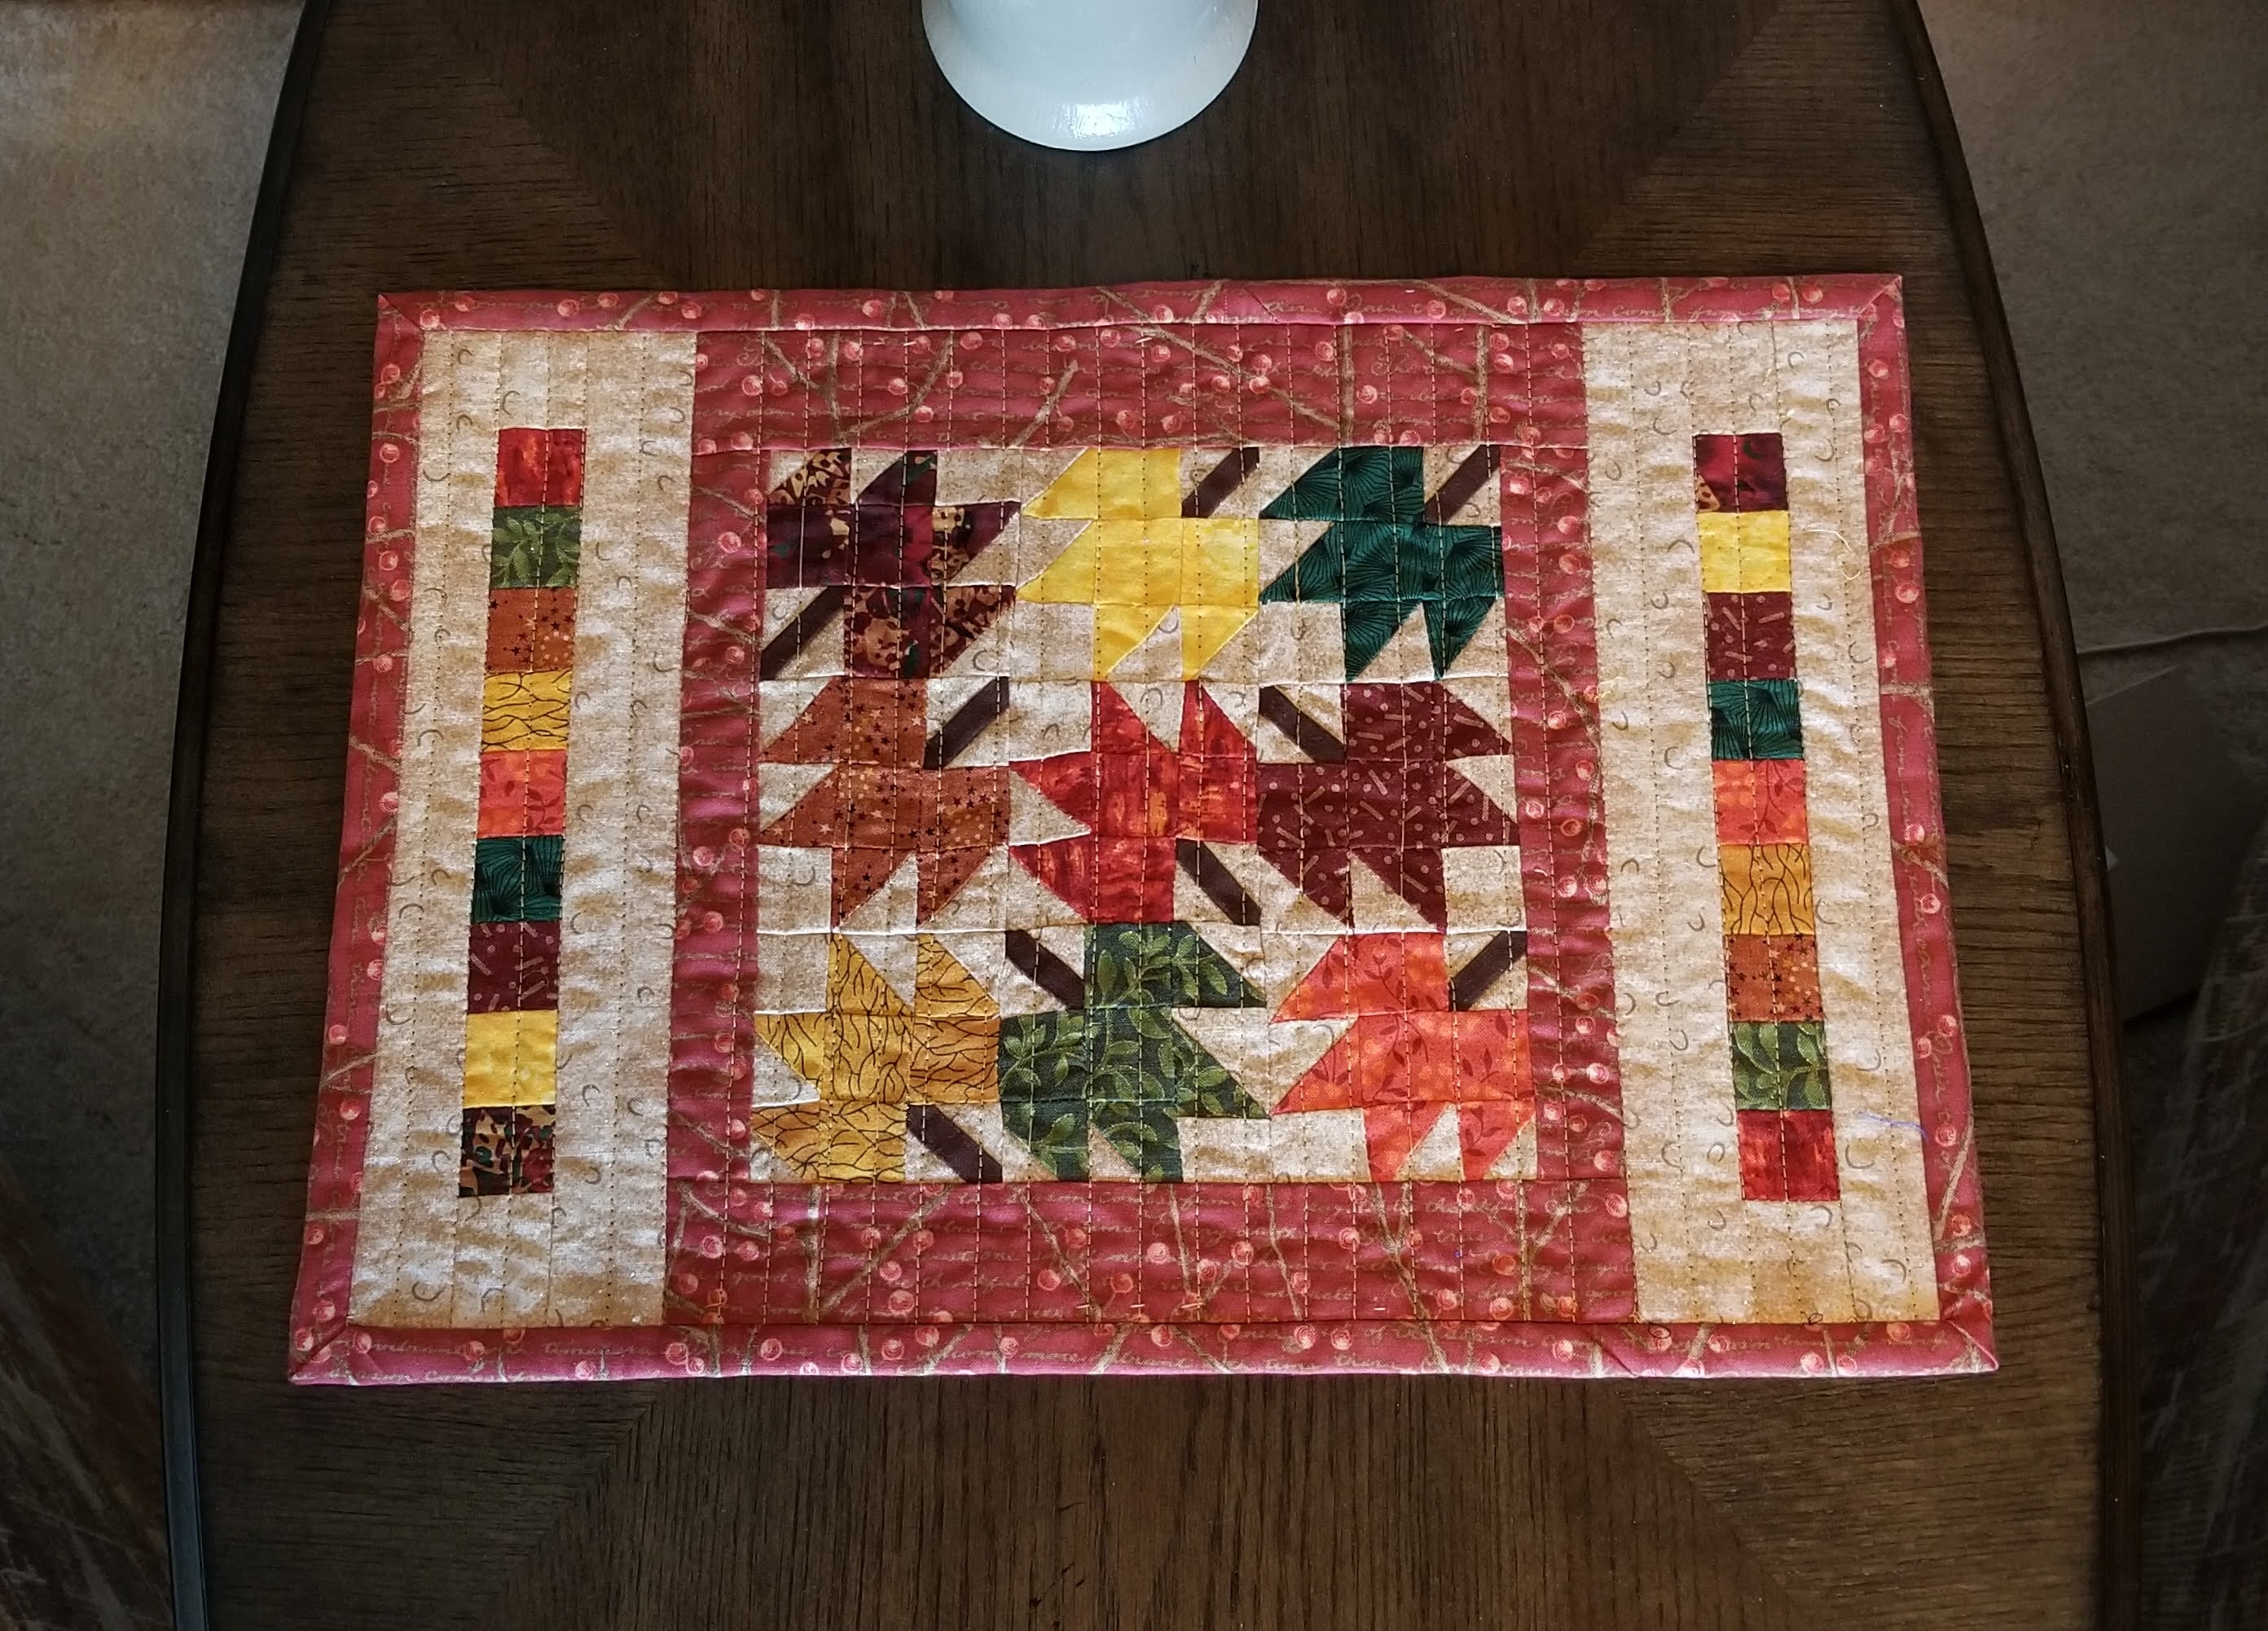
I was overjoyed to see that pink was the chosen color for January's Rainbow Scrap Challenge (RSC) ...such a pretty, happy color to start off the year! 

It's also perfect to use for a Valentine's table runner.

I saw this block called "Be Mine" on the Perkins Dry Goods blog

I loved it the moment I  saw it. 


I made 3 blocks (12.5" x 12.5" each) and added a sashing on each side of the middle one.

I chose a loop and heart motif as I free-motion quilted. 

I'm getting more comfortable with my FMQ !


I really enjoyed using up some of my pretty pink scraps to make 

this runner for Valentine's Day.

Joy at The Joyful Quilter has started a new link up this month called

Table Scraps. Please consider adding a project to join the fun. 

Linking up with: 

So Scrappy RSC January

The Joyful Quilter Table Scraps Challenge January


Saturday, January 23, 2021

Project Quilting 12.2 Fussy Cutting and Sew Sweetness January Challenge


I was sewing double duty this week! 

Persimon Dream's Project Quilting's task was to use fussy cutting in a completed project. 

I decided to include the fussy cutting in the Sew Sweetness January Challenge which was to stitch up any Sew Sweetness pattern. I chose a free pattern called the Persimmon Dumpling Pouch. This sweet pouch comes in 3 sizes (I made the small and medium sizes) and is absolutely easy to do following Sara Lawson's video tutorial and written directions. I know I'll be making more in the future!


I started with fussy-cutting strips of fabric that I've set aside over the years for just this reason. Most strips were 2" wide and sewn with 1/4" seam. 
Above were the sections sewn for the medium sized Dumpliing Pouch.


Quilting the newly-made fabric was fun. 
Shape-Flex Fusible Woven Interfacing helps to give the sides of the pouch some stiffness,
 and also gives the fabric depth when quilting. 

I even did some FMQ about shapes to help the designs stand out. 


You can't scare me, you sneaky zippers!
The lighting is poor here, but I have an awesome view over a pond just beyond our backyard.


Here's the finished pouches! So darned cute!


For some reason, one end on each pouch is wonky where the seams line up. 
It doesn't affect the structure, and is only aesthetics. 
Still....it bugs me.


It was fun choosing some coordinating lining fabric!

Ok, so if you don't mind a bit of "wonky", I'd love to give this smallest pink-zipped pouch to one of my readers!  
(Email subscribers and Bloglovin' followers of this blog may be given preference!)

Congrats to The Joyful Quilter for winning the Artsy Bib in my last post!

Please leave a comment on this post stating that you are interested and I will draw a name next weekend. (US addresses only, please.) You will have 48 hours to reply to my email to win. 
*Sharpie pens not included.

Linking up with:


Saturday, January 9, 2021

Project Quilting 12.1: Illuminating + Ultimate Gray


Sometimes inspiration doesn't happen at the speed of light. 
Sometimes it doesn't happen at all.
For me, it came just in the  nick of time.

This is the first week of Project Quilting 2021 sponsored by Persimon Dreams. 
This challenge requires the use of Pantone's Color of the Year, which actually is 2 colors. 
Any shades of either color are acceptable, along with white/and or black.
Along with those basics, each project must include at least one of the following:
patchwork
applique
3 layers stitched together

Call me an overachiever.
I've included all 3 of the above.


Somehow, I saw a vision among these scraps. 


I "made" my own fabric by stitching those scraps together. 
Such fun!
Soon the piece was big enough to make a baby bib.


I got it traced and cut out.
Ready for quiltin'!


Simple cross-hatch quilting on Franken-batting.


A cute Mary Englebreit-type flower was sewn and appliqued to give a bit of a feminine touch.


Backing is a yellow light terrycloth for ultimate absorbency!


If you've made it this far and you've decided you really like this artsy bib, go ahead and leave a comment! 
Mention that you'd like to have your name added to the hat. 
I'll choose a winner on January 17th and will email the lucky one. 
(U.S. addresses only please)
A reply email must be sent to me within 48 hours or I will need to choose another name. 

Linking up to:


Tuesday, December 1, 2020

Mini Autumn Table Topper


I really didn't need a new table topper. 

You know how it is when you see something you like, you just have to make it? 

That's my trouble with reading blogs...so many ideas and so little time!

This time I saw the Little Leaves block and wall hanging project on Temecula Quilt Company's blog. 

I thought I'd like to make a mini wall hanging for my front door. 

But once I made a few little leaves blocks, I wanted to make more!


So I made nine 3" blocks. They were a bit fiddly, but SO darned cute!


I sewed them together and added a coordinating border. 


I also added a colored stack of the leaf fabrics to each side to make the piece wider. 

Straight line quilting was all it needed.

This little guy was no longer going to hang on my front door. 
I wouldn't be able to admire it if it was facing outside!


So it found its way to the small table in our sitting room. 
Of course, we had to have matching coasters too!

It was completed just a week before Thanksgiving, which was good timing. 

Tomorrow (or the next day or maybe next week), the turkeys and pumpkins and fall quilted projects will be put away. 
All to be replaced with sparkly Christmas things!

Table topper measures: 10" x 15"
Coasters: 4" square

Linking up with....

Sunday, November 1, 2020

A Modern Table Runner


It all started with this:

I came across a big tub of college textbooks in our capped garage. The moment I opened the lid, I knew they were mine. Children's Literature, Teaching Math in Elementary Grades, Roget's Thesaurus...all were nearly 35 years old! Time to go, right? I cut off the hard covers and bindings and threw the insides in the recycle bin. But at the very bottom lay the little book of lens papers. Likely from my freshman semester of Biology and dissecting frogs, pig hearts, and building fruit fly farms. Not one of the lens papers had been used...all 50 sheets were intact. 

They, too, went into the recycle bin. But soon came out!

I knew I could put them to use. I'd seen scraps sewn onto long strips of calculator paper. I didn't have any calculator paper, but Lord knows I have scraps and now I had lens paper! Plus, this paper is so much thinner that regular paper, so I didn't have to worry as much with my needle dulling. 

I  had no project in mind, but I just enjoyed gathering like colors to make blocks, that when trimmed, were about 4" x 6".  Mindless sewing is just the best, isn't it?


Blocks with backing paperOn the left are the blocks before tearing off the backing (lens) papers. The right photo is after I had them all sewn together and trimmed. 

Deciding this would make a great layout for a table runner, I kept the sashing simple. 
I used Kona Snow for the sashing and binding. 

I was very  tempted to use a striped fabric for the binding, 
but it pulled the attention away from the center blocks. 

I'm SO glad I went with the Kona Snow binding...it's perfect!


I followed Debbie Jeske's tutorial for organic straight line quilting
I love Debbie's style and tutorials at A Quilter's Table blog.
Her tutorial made this quilting fun, easy and so modern!

I used 6 different thread colors to create interest in this wavy technique. 
I will definitely use it again!


Thanks for stopping by!

Linking up with:

Saturday, October 31, 2020

RSC October: Yellow! (the finale)


October's RSC color ends on a happy note with yellow! 
I worked with a teacher for a few years whose favorite color was yellow. 
She loved it because it always brought happiness.

 How many things in life are yellow and make you feel happy? 
Sunshine, bananas, lemons, baby chicks, daffodils, mac and cheese,
 mustard, corn on the cob...all make me happy!

So my last 2 rows of the quilt bring happiness. 

It'll bring even more happiness once I get it quilted and bound! 

That'll be a job for a bitterly cold afternoon in the next few months.


9 months of RSC rows!

My scrap bins seem to be no less full ...how's that happen?


My wonderful helper!
He makes me happy too!  💜

Linking up to:


Saturday, September 19, 2020

Celebrating National Jelly Roll Day!


Today I finished my jelly roll quilt!

I started this Ridiculously Easy Jelly Roll quilt back in June. 

That's when the top looked like this below.

Knowing what I know now, I should've kept it the original size.

But I was intimidated by it. I thought I'd never be able to get it quilted on my own.

So I cut off one of the set of strips from both the top and bottom. 

One of the strips I added to the backing. 


I used a simple meander stitch to free-motion the layers together. 

Using this stitch was much easier than I had thought and went very quickly.

It was during this time when I wished it was still full size.

Oh well! Next time!


I used most of the Moda Savannah jelly roll I had on hand, 
and also a good chunk of a solid black jelly roll too. 

There were also light coral colored strips in the Savannah collection, but it felt a bit girly
to include those since this would be going to my someday-son-in-law.

I added a label to the back corner.

And here is Jordan receiving his quilt on his 30th birthday!
He's kinda shy, but he loved it!


The Ridiculously Easy Jelly Roll Quilt pattern is available here at Michelle Cain's blog 
From Bolt to Beauty. It is a freebie! It's also available on her link tree on Instagram. 


I hope you found some time today to sew with a jelly roll!
I have a few more in my stash that still need a project.

Linking up with: