Wednesday, September 21, 2016

My Crosscut Quilt

I was a bit late in joining the party to the Crosscut Quilt-Along I found on Instagram this past summer. Yep, summer 2016 has already PASSED! How did that happen??? The moment I saw some of the photos, I knew I had to join in. I love modern, improv quilting and this was just my groove.

Debbie at A Quilter's Table is the designer of this technique and she has one heck of a creative mind! I could make a thousand of these and no two would look alike.
You can follow her tutorial here: Crosscut Block Tutorial.

Here's my Crosscut journey:


 I chose my fabrics from my stash according to the décor of "someone special".
This will be a Christmas gift, so no names will be shared here!


These are my first 9 blocks. Already looks cool, doesn't it?


I needed many more blocks to make a quilt big enough to wrap up in while on the couch,
so more were added.


This is a crappy photo, but I laid it on top of a black fuzzy throw we use often in our house.
I needed to compare sizes. More blocks needed!


Just a pretty pic of the triangles and strips.
Not many things really look good against my purple cutting mat.


Here is the full top BEFORE it was cut apart!!
This is the step that I didn't think I could do....I had to cut it up!
But I did.
And I was happy.


The first few cuts.


The freshly cut blocks scattered on the floor as I tried to find the best arrangement.


Proof that Miss Sophie was here!
The stinker.


Here is the new Crosscut quilt top all sewn back together.


A close up before quilting.


These are photos of the back. I used some leftover fabrics to cut feathers using a template I found online. Then I used Lara Buccella's technique from her book Crafted Applique to adhere them. I have wanted to try Lara's technique since her book came out earlier this year, so this was the perfect time! It turned out wonderfully and added a lot to make a very unique backing for this quilt.

I machine quilted this 50" x 60" Crosscut quilt using a wavy stitch starting on one corner and going to the adjacent corner making curves. Of course, the curves got bigger and bigger the farther I went.
I really like the effect overall.

The finished product:


I am entering this quilt into two challenges:


Sunday, September 18, 2016

I Owe My Sanity to Ruby


Four years ago when I quit my full time teaching position, my husband surprised me with a gift I will always be thankful for. Ruby. A Designer Ruby sewing/embroidery machine made by Husqvarna Viking. I already had a Singer sewing machine for over 25 years and had made wardrobes of clothes and costumes for my kids.
But this machine was different. Not only could it sew, but it could embroider!

It came in a huge red case that looked like a suitcase. It sat on our dining room floor for almost 3 months before I had the courage to even take it out!!

Keep in mind that I was suffering from severe teacher burn-out and possibly some depression. My brain was fried, along with my nerves and it took me 3 months to rehabilitate to even think about starting something new. My husband finally sat down with me and helped me figure out how to use Miss Ruby. He lit the candle inside me! I was soon watching youtube videos, joining facebook machine embroidery groups, and practicing almost daily.

Since then, I've spent a small fortune on embroidery designs, stabilizers, threads and not to mention fabric! That machine saved my sanity.  I started making baby bibs and personalizing them with names and an applique. Soon I was embroidering on shirts, towels, and tote bags. I've made probably 100 in-the-hoop mug rugs with names on them. I've also made several wall hangings with verses, along with outdoor garden flags. I haven't shared many of my projects here, so I thought I'd do that in one post. These are not all, but a good smattering of what I've worked on.


And then I got the quilting bug....


Wednesday, August 31, 2016

Book: The Drawing Lesson by Mark Crilley

I have always enjoyed doodling and drawing. As a young girl, if I couldn't get my hands on a book to read, I could be found coloring on the backs of envelopes Mom had tossed from paying the bills, or I'd be sketching objects on a notepad. I thought of coloring books as too limiting. Anyone can fill in the spaces between the lines. It's the lines that require a creative mind!

Because I still love to read and want to learn to draw better, I was immediately "drawn" to this book. The Drawing Lesson by Mark Crilley is described as "a graphic novel that teaches you how to draw". It is written in comic-book style with each panel sketched with pencils. It is so easy to read and follow along. At the end of each chapter, a suggested "assignment" is given to the reader to practice the drawing lesson that was taught.

It's quite an interesting book as you get to know the characters. David, is a young boy who wants nothing more in life than to learn how to draw. Luckily for him, he comes upon Becky, a 30-something woman, who was enjoying her afternoon in the park drawing away on a sketchpad.

David, enticed by her talents and artistry, asks her if she'd teach him how to draw. Becky, of course, has a life of her own and has no idea that David is going to be a constant side-kick for awhile. One lesson is contained in each chapter and focuses on the skill that Becky teaches David. We see David's drawing develop within the panels and even witness David making mistakes. We also see Becky's frustration and wild facial expressions!
I do think she tends to over react at times, but that makes it fun.

As I read each chapter, I closed the book and picked up my drawing pencils and sketchbook to complete the assignment. Believe it or not, I still have the pencils I used back in college in the early 80's. It was like going back in time, I tell ya!

Follow along as I take you through the chapters.
Photos and drawings are side by side so you can see what I was trying to draw!

Chapter 2: Drawing What You See (my watch)


Chapter 3: Shading (a leather chair in the family room)


Chapter 4: Beginning With a Loose Sketch (an apple in a glass bowl)


Chapter 5: Understanding Light and Shadow (a candle)


Chapter 6: Using Negative Space (a hotel room in Minneapolis)


Chapter 7: Checking Proportions (my patient husband)


Chapter 8: Simplifying Things (the Crab Apple tree in the front yard)


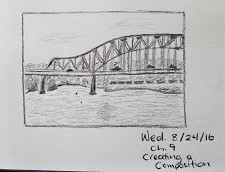
Chapter 9: Creating a Composition (the Julien Dubuque Bridge from the Iowa side)


There is one more drawing assignment I need to complete. It is Chapter 10: Bringing It All Together which uses all of the skills taught in the book to make one ambitious drawing! Almost like a final project or a doctoral thesis. I will get it done!

I truly enjoyed this book and learned a lot from the lessons. It was fun to watch the friendship grow between Becky and David and see David's talents develop too.
I think my talents were strengthened along with David's!

If you'd like to read more about the author of this book, you can click here: Mark Crilley
You can also read more about this book here: The Drawing Lesson


FTC disclaimer: "I received this book from Blogging for Books for this review."


Friday, August 19, 2016

5 Things to Be Happy About #3

It's hard to believe it's mid-August already. Summer always seems to fly by, especially for those of us who wait nine months for it. Kinda like waiting for a baby.


Here's my 5 things that made me happy this past week. Listed in no particular order.


1. Mister Crabby Pants! I saw this little guy at the library and couldn't resist asking his mom if I could take a picture of his shirt. She didn't mind at all! Of course, the hardest part was trying to get him to stand with his back to me. I imagine not many folks ask for a picture of his backside!
Love that shirt.


2. Woohoo! My quilt in the previous post was chosen as the featured post on Quilt Fabrication's Midweek Makers! What an awesome honor and one I'm pretty tickled about. Of course, no one but a fellow blogger would understand my enlightenment. Not even my husband. Oh, well.


3. I saw one of my bibs in person at a local eatery. I've been making personalized bibs for several years for baby gifts. I'd guess I've made about 100 of them, but I've never seen one out in public on a baby until this day! Of course, I asked Lila's mama if I could take a photo AND post it on my blog...all was OK with her. Her mom said, "Say cheese" to Lila and she replied "Amen"! So cute!


4. My best friend had a birthday this week, so I made her a card. She loves blue, so I used some blue scraps to sew up 2 Bluebirds of Happiness on a limb carrying a message. Of course, the poem inside might have said something about "crap". She loved it!


5. Now this is a rare one! You won't find a photo of me too often, so pay attention! :)
I was in the "pucker" Kim Kardashian pose...my lips don't really look like that. My husband and I were celebrating our 33rd wedding anniversary. We've gone to the very same place every year to dine on our anniversary. It's the same place we had our reception back in 1983.
Gosh, I love that man.


I am linking up with:


What made you happy this week?